Git to ISPW Integration Tutorial
This tutorial helps developers understand how to synchronize ISPW and Git. It uses the ISPW training application, called PLAY, to synchronize a change to a component from Git to ISPW. The sync can be done after the necessary setup is completed within Topaz Workbench and an ISPW project containing the PLAY application source code is imported to a Git project. That project is then pushed to the Git repository as the master branch in Bitbucket. Then a new file change is pushed to Git, which then triggers a Jenkins multibranch pipeline job to perform the Git to ISPW integration and perform a build.
There are three sections in this tutorial:
Environment Specifications: this section describes what environments to use to follow the steps outlined in this tutorial. If a different version of any of the software or plugins are used instead of the versions specified in the Environment section, different results may occur than what is shown in this tutorial.
Process Overview: this section provides a brief overview of the steps for performing the Git to ISPW integration. This section outlines the following:
Detailed Steps: this section provides the comprehensive steps to perform the Git to ISPW integration.
Environment Specifications
These are the minimum releases of software and plugins required.
Topaz Workbench 20.01.01 including:
- Egit in Eclipse 5.6.0
Jenkins version 2.190.3 including:
- Topaz Workbench CLI version 20.01.01
- Compuware Common Configurations Jenkins plugin 1.0.10-SNAPSHOT
- ISPW Operations Jenkins plugin 1.0.8-SNAPSHOT
Atlassian Bitbucket v5.16.0
ISPW PLAY application 18.02
Process Overview
Set up the environment
- Install the necessary plugins in Topaz Workbench and Jenkins.
- Verify the ISPW mainframe PLAY application is available.
Set up a Git Project and a Jenkins Multibranch Pipeline
The Git project will include the source, a YAML file, and a Jenkinsfile.
TIP
If the PLAY application is already in Git but the Jenkins Pipeline is not set up, skip steps 1-4 and proceed to step 5. If the PLAY application is already in Git and the Jenkins Pipeline is set up, skip steps 1-8 and proceed to the next section.
- From Topaz Workbench’s Project Explorer view, create a new general project called GitPlay and import the ISPW project source.
- From Topaz Workbench’s Project Explorer view within the GitPlay project, configure the ISPW and Git mapping.
- From Topaz Workbench’s Project Explorer view, share the GitPlay project as a Git repository to convert the general project to a Git project..
- From Bitbucket, create a new Git repository named IspwGitPlayTest.
- In the Jenkins UI, create a multibranch pipeline project using the Jenkinsfile.
- Create a Jenkinsfile, which does a checkout of the source code, performs the Git to ISPW synchronization, and performs a build.
- From Topaz Workbench’s Project Explorer view, import a Jenkinsfile to the root directory of the GitPlay project.
- From Topaz Workbench’s Git Staging view, commit and push the GitPlay project to the master branch in the IspwGitPlayTest repository.
Make a change and build
- From Topaz Workbench’s Project Explorer view, switch to a new branch named PlayBranch1.
- From Topaz Workbench’s Project Explorer view within the IspwGitPlayTest project, make a change to a Cobol component TPROG01.cob.
- From Topaz Workbench’s Project Explorer view within the IspwGitPlayTest project, perform the build action to verify the source generates successfully along with any impacted components.
- From Topaz Workbench’s Project Explorer view within the IspwGitPlayTest project, update the Jenkinsfile Build ISPW Assignment stage.
Submit change to pipeline
- From Topaz Workbench’s Git Staging view, commit and push the changes to Git.
- From Jenkins, check the console output of the multibranch pipeline project job to determine whether the synchronization process completed successfully.
- From Topaz Workbench, go to the assignment where the component was loaded to verify the updates occurred to the mainframe.
- From Topaz Workbench's Project Explorer, go to the project properties to configure a copybook concatenation list.
Detailed Steps
Set up the Environment
Install the Necessary Plugins in Topaz Workbench and Jenkins
Topaz Workbench
Install Egit: Refer to https://www.eclipse.org/egit/download/ (opens new window) for the installation.
Jenkins
Install Topaz Workbench CLI version 20.01.01 on Windows or Linux according to the following Topaz Workbench Installation Guide (opens new window)
Update Jenkins configuration for the Topaz Workbench CLI
In Jenkins, click Jenkins, select Manage Jenkins, and then select Configure System and set up the Topaz Workbench CLI location and a host connection.
Compuware Common Configurations Jenkins. For the installation, refer to Tool Configurations/Compuware Common Configuration.
ISPW Operations Jenkins plugin. For the installation, refer to Tool Configurations/Compuware ISPW Operations Plugin.
Verify the ISPW mMinframe PLAY Application is Available
Verify the ISPW PLAY application was installed as part of the ISPW install. It is installed as part of the Training Application delivered in the ISPW SAMPLIB that is as part of the Installation Verification Process (IVP).
If the following steps can be executed successfully, then the PLAY application was successfully installed in the ISPW instance based on the host connection.
If you are unable to locate the PLAY application, refer to the ISPW Installation and Configuration Guide section entitled Installation Verification Procedures, which includes information on installing the ISPW mainframe PLAY application. The ISPW Installation and Configuration Guide can be found at go.compuware.com.
In Topaz Workbench, open the ISPW perspective. From the Window menu, select Open Perspective>Other. The Open Perspective dialog box appears. Select ISPW and click OK. The ISPW Repository Explorer view appears.
Note: The ISPW Repository Explorer view is visible by default. If it is not visible, from the Window menu, select Show View>Other. The Show View dialog box appears. Toggle open ISPW, select the ISPW Repository Explorer view, and click OK.
Do the following:
- From the Stream list, select PLAY.
- From the Application list, select PLAY.
- From the Level list, select DEV1.
- From the Level option list, select First found in level and above.
Click Apply. A filtered list of the components within the PLAY application appears.
TIP
If you are not logged into a host connection where the ISPW PLAY application is installed, you will be prompted when you select any list in the ISPW Repository Explorer view.
Set up a Git Project with the Source, YAML File, and Jenkinsfile, and Set Up a Jenkins Multibranch Pipeline
Create a New General Project called GitPlay and Import the ISPW Project Source
- In Topaz Workbench’s Project Explorer view, from the File menu, select New>Project. The New Project wizard appears.
- Toggle open the General node, select Project, and click Next. The New Project page appears.
- In the Project name field, enter GitPlay and click Finish.
Configure the ISPW and Git mapping
In Topaz Workbench’s Project Explorer view, right-click the GitPlay project node and select Configure>Configure to Use ISPW. The Configure ISPW and GIT Mapping wizard appears.
From the Host list, select the host where the PLAY application is located, or click Configure to configure a host. Compuware recommends using the fully qualified domain name when configuring the host.
In the Runtime Configuration field, enter the runtime configuration if not using the default ISPW instance.
Click Next. The next page of the wizard appears.
From the Stream list, select PLAY.
From the Application list, select PLAY.
From the Level list, select the level used when doing a build.
From the Download source from path list, choose the level from which to download source for the project.
In the YAML mapping file location field, enter or browse to the project folder in which to create the YAML mapping file. By default, the location is the root of project.
Click Finish. The source is downloaded. The ispwconfig.yml file is created and added to the root of the GitPlay project in the Project Explorer view. The Console view shows the activity and the Project Explorer view shows the downloaded files.

To examine the contents of the ispwconfig.yml file, right-click the file and select Open.
!!com.compuware.ispw.cli.model.IspwRoot
   ispwApplication:
   application: PLAY
   host: somehost.example.com
   pathMappings:
   - path: \CLST
   types:
   - fileExtension: clst
   ispwType: CLST
      - path: \COB
   types:
   - fileExtension: cob
   ispwType: COB
      - path: \COPY
   types:
   - fileExtension: copy
   ispwType: COPY
      - path: \JOB
   types:
   - fileExtension: job
   ispwType: JOB
      port: 12345
      runtimeConfig: TPZP
      stream: PLAY
Refer to the ISPW to GIT Integration: ISPW YAML Configuration File for information on the available ISPW property settings and path mappings that can be in the ispwconfig.yml file.
Share the GitPlay project as a Git repository to convert the ISPW project to a Git project
In Topaz Workbench’s Project Explorer view, right-click the GitPlay project node and select Team>Share Project. The Share Project dialog box appears.
Select the project from the list.
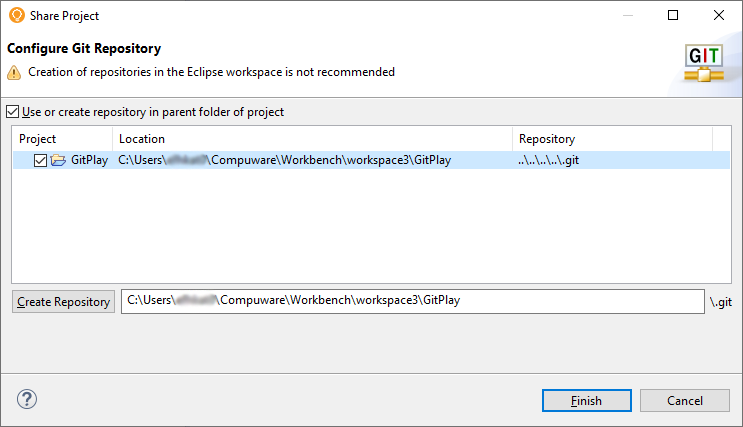
Click Use or create repository in parent folder of project.
Click Create Repository.
Click Finish.
Create a New Git repository Named IspwGitPlayTest
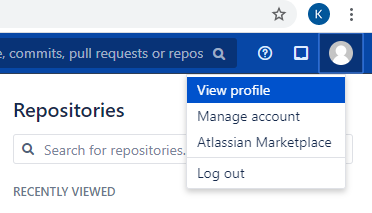
Go to the Bitbucket Server.
To create a personal repository, click your profile and select View profile, then select Create repository.
TIP
Depending on the Git server (GitHub, Bitbucket, etc.) and interface (web, desktop, etc.) you are using, the nomenclature and way to create a new repository may differ from what is shown here. Refer to your Git server's online help.
Create a Multibranch Pipeline Project Using the Jenkinsfile
- In the Jenkins UI, click Jenkins and select New Item.
- In the Enter an item name field, enter the name for a multi-branch pipeline project.
- Select Multibranch Pipeline for the list.
- Click OK.
- Optionally, on the General tab for configuring the pipeline just created, enter the display name and description.
- Select the Branch Sources tab, click Add source, and select Git from the list.
- In the Project Repository field, enter the project repository URL and, in the Credentials field, enter the credentials if the account is private. The project repository URL can be found in the Bitbucket Repository Settings of the IspwGitPlayTest repository in the Name field.
- Select the Build Configuration tab. The Mode field should already be set to by Jenkinsfile and the Script Path should be set to Jenkinsfile. In a later step, the Jenkinsfile will be created at the root of the project where this setting expects it to be located. Therefore, do not make any further changes on this tab. Select the Scan Multibranch Pipeline Triggers tab. Select the Periodically if not otherwise run check box and set the Interval field to 1 minute.
- Click Save. A Scan Multibranch Pipeline Log appears. If the pipeline was set up correctly, Finished: SUCCESS will appear at the end of the log.
Create a Jenkinsfile
This step implements a Jenkins pipeline within a Jenkinsfile. The Jenkinsfile is broken up into three stages:
- Checkout - checks out the source code.
- Git to ISPW Synchronization - performs the Git to ISPW synchronization.
- Build ISPW assignment - performs a build.
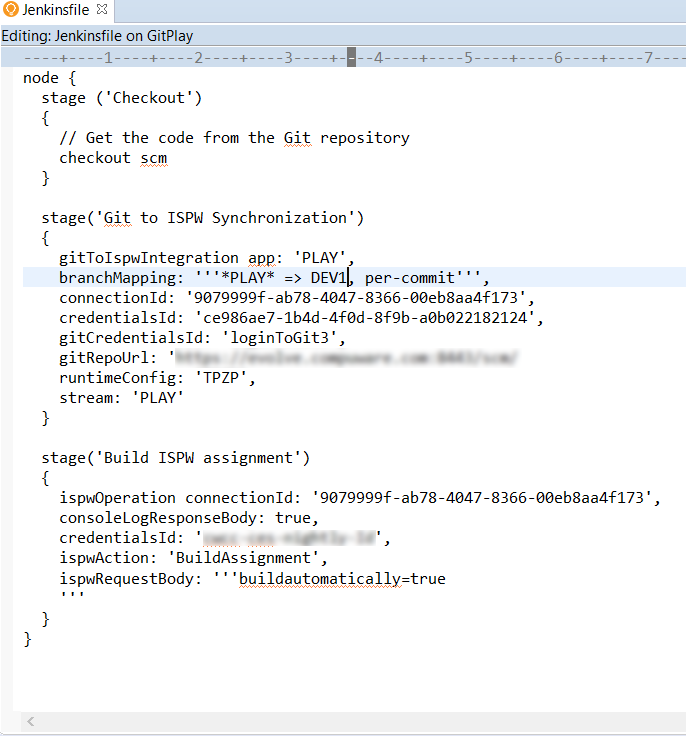
The following is an example of the Jenkinsfile.
node {
  stage ('Checkout')
  {
    // Get the code from the Git repository
    checkout scm
  }

  stage('Git to ISPW Synchronization')
  {
	gitToIspwIntegration app: 'PLAY',
	branchMapping: '''*Play* => DEV1, per-branch''',
	connectionId: '9079999f-ab78-4047-8366-00eb8aa4f173',
	credentialsId: 'ce986ae7-1b4d-4f0d-8f9b-a0b022182124',
	gitCredentialsId: 'loginToGit3',
	gitRepoUrl: ''https://host:port/path/ispwgitplaytest.git',
	runtimeConfig: 'TPZP',
	stream: 'PLAY'
  }

  stage('Build ISPW assignment')
  {
	ispwOperation connectionId: '9079999f-ab78-4047-8366-00eb8aa4f173',
	consoleLogResponseBody: true,
	credentialsId: 'your-credential-id.1conn',
	ispwAction: 'BuildAssignment',
	ispwRequestBody: '''buildautomatically = true
	'''
  }
}
Launch a text editor.
Copy the script from the example above and paste it into an empty text file. It will be customized in the following steps.
Note: There is no need to customize the first stage, Checkout, for this tutorial as it does a checkout scm, which is Jenkins’ out-of-the-box method for checking out code in the pipeline. It can, however, be customized using the the Snippet Generator’s checkout: Check out from version control, if desired.
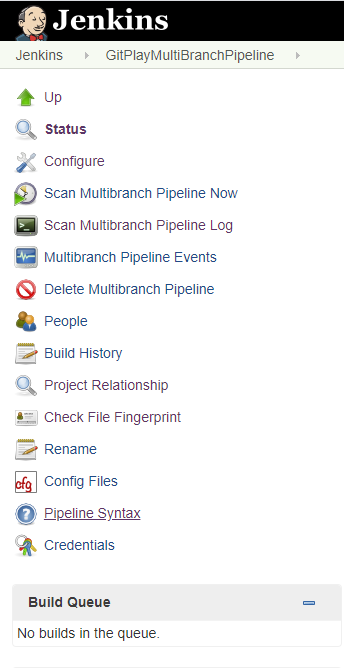
In Jenkins, navigate to the Jenkins multibranch pipeline project.
From the project’s left pane, select Pipeline Syntax. The Snippet Generator appears.
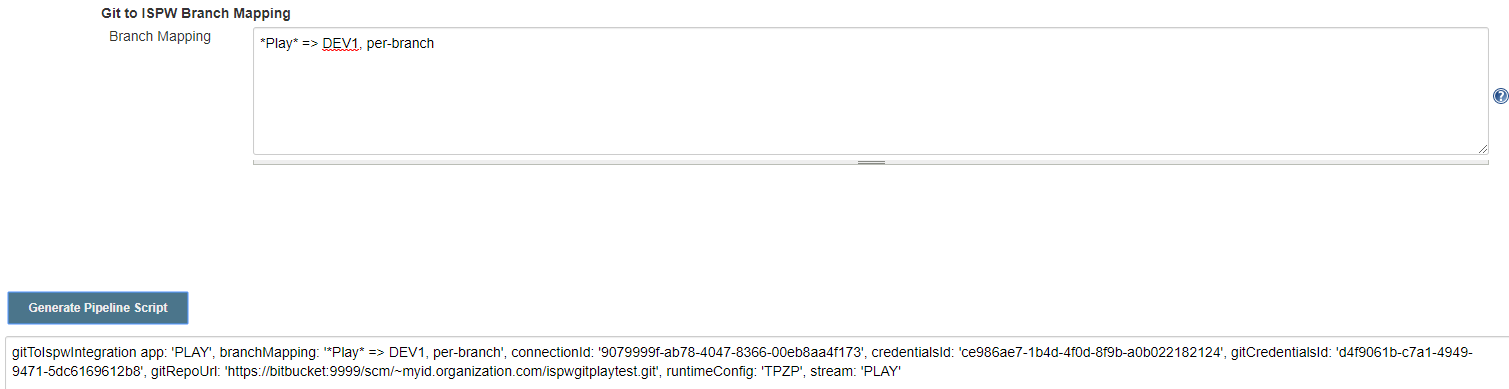
To begin defining the syntax for the second stage, Git to ISPW synchronization, in the Sample Step field, select gitToIspwIntegration: Git to ISPW Integration.

In the Branch Mapping field, enter *Play* => DEV1, per-branch.
TIP
The first field in the branch mapping (*Play*) is part of the branch name PlayBranch1, which will be used to do the commit and push in a later step. Therefore, it is important that the mapping matches the branch name or part of the branch name with a wildcard for the multibranch pipeline project to be completed successfully.
Complete the rest of the fields, referring to the available help as needed.
Click Generate Pipeline Script. The generated script appears below the Generate Pipeline Script button.
NOTE: For ISPW Operations Jenkins plugin 1.0.7 or older, if any user ID or login credentials are present at the beginning of the Git repository URL, remove them. :::
Copy and paste the generated script within the second stage in the text file, replacing all code between the curly braces for that stage.
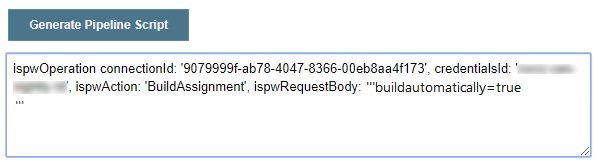
To begin defining the syntax for the third stage, Build ISPW assignment, in the Snippet Generator’s Sample Step field, select ispwOperation: Perform a Compuware ISPW REST API Request and return a JSON object.

In the Action field, select BuildAssignment.
In the Request field, specify the following:
buildautomatically=trueComplete the rest of the fields, referring to the available help as needed.
Click Generate Pipeline Script. The generated script appears below the Generate Pipeline Script button.
Copy and paste the generated script within the third stage in the text file, replacing all code between the curly braces for that stage.
In the text editor, from the File menu, click Save. The Save As dialog box appears.
In the File name field, enter the following, exactly as shown and including quotation marks to create the file without an extension. The file name is case-sensitive.
“Jenkinsfile”
Import a Jenkinsfile to the Root Directory of the GitPlay Project
In Topaz Workbench’s Project Explorer view, right-click the GitPlay project node.
Select Import. The Import wizard appears.
Select General>File System and click Next. The File system page appears.
In the From directory field, browse to the folder location of the Jenkinsfile.
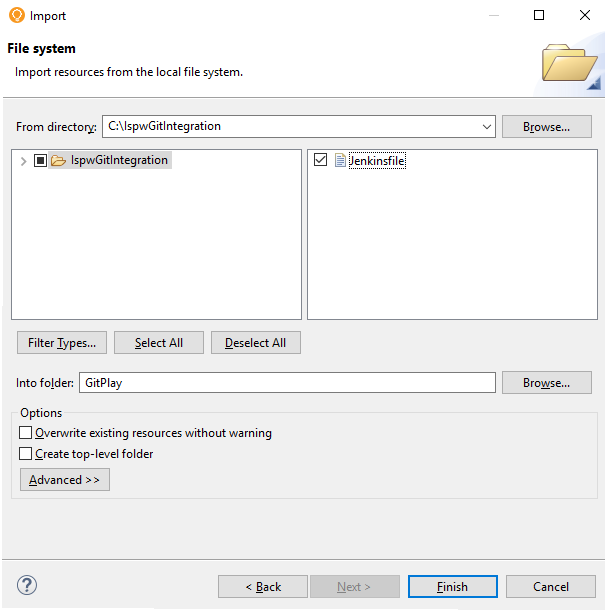
Select the Jenkinsfile in the right pane.
Click Finish. The Jenkinsfile appears at the root of the GitPlay project in the Project Explorer view.

TIP
It is important to ensure that the Jenkinsfile is located at the project root, where the multibranch pipeline project’s configuration Script Path field expects it to be.
Commit and Push the GitPlay Project to the Master Branch in the IspwGitPlayTest Repository
In Topaz Workbench, open the Git perspective.
If the Git Staging view is not visible, from the Window menu, select Show View>Other. The Show View dialog box appears. Select Git>Git Staging, and click Open.
If there is no repository selected in the Git Staging view, click
 and select GitPlay to switch to the GitPlay repository.
In the Unstaged Changes box, select all of the components and click
 to add them to the Staged Changes box.
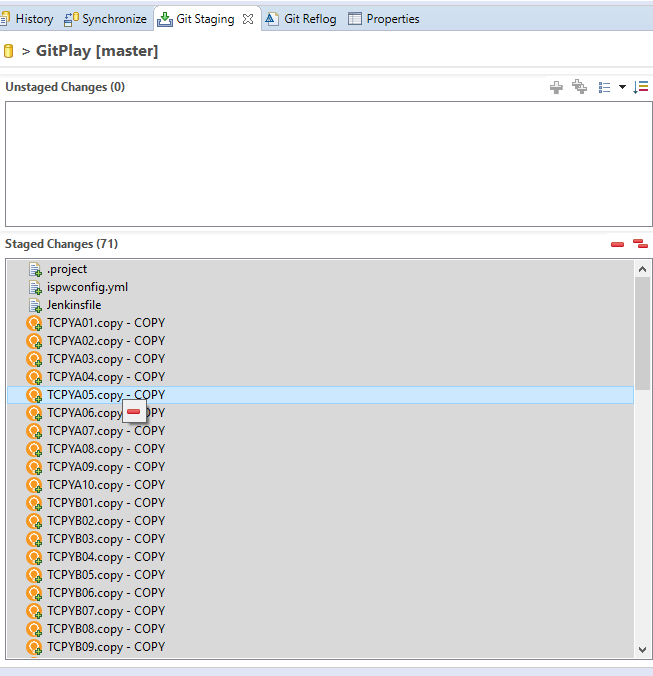
In the Commit Message box, enter a commit message, such as Commit to master.
Click Commit and Push.
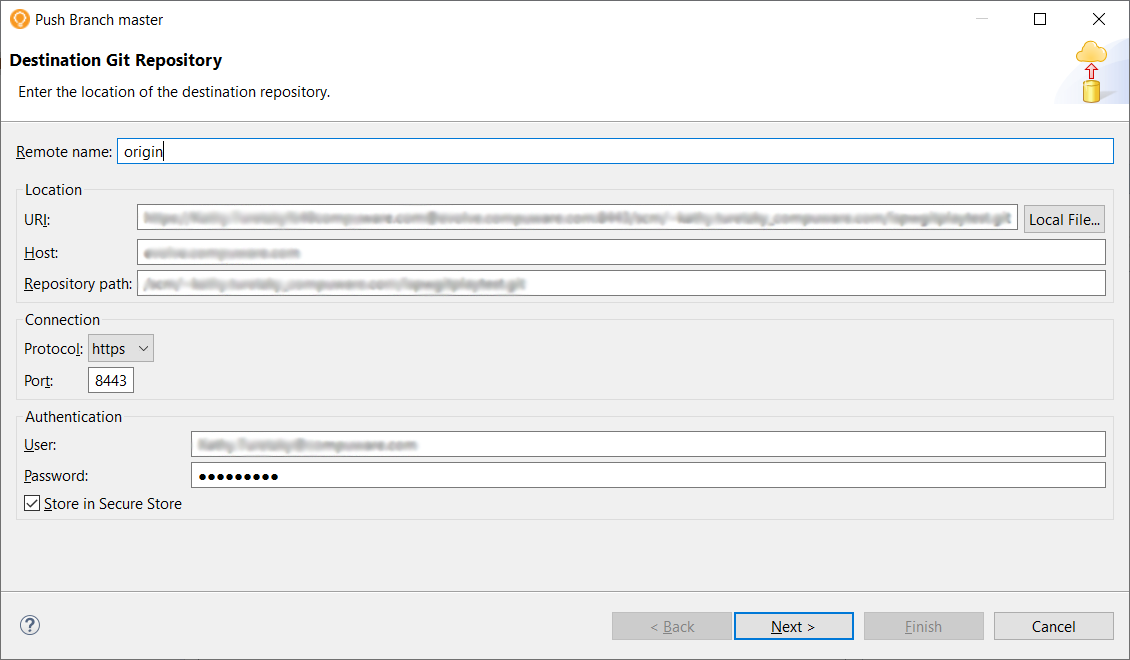
If the Push Branch master dialog box appears, in the URI field, specify the URL of the IspwGitPlayTest repository. The repository URL can be found in the Bitbucket Repository Settings of the IspwGitPlayTest repository under the Name field. Complete the rest of the fields if not automatically populated. Click Next to select the remote repository. The repository name should contain the branch name. Click Next again to confirm the expected push result, then click Finish.
In the Push Results dialog, click Close

Make a change and build
Switch to a New Branch Named PlayBranch1
- In Topaz Workbench’s Project Explorer view, right-click the GitPlay project node and select Team>Switch To>New Branch. The Create Branch dialog box appears.
- In the Branch name field, specify PlayBranch1 as the branch name.
- Click Finish.
- Verify that GitPlay project node in Project Explorer is now set to PlayBranch1.

Make a Change to Cobol Component TPROG01.cob
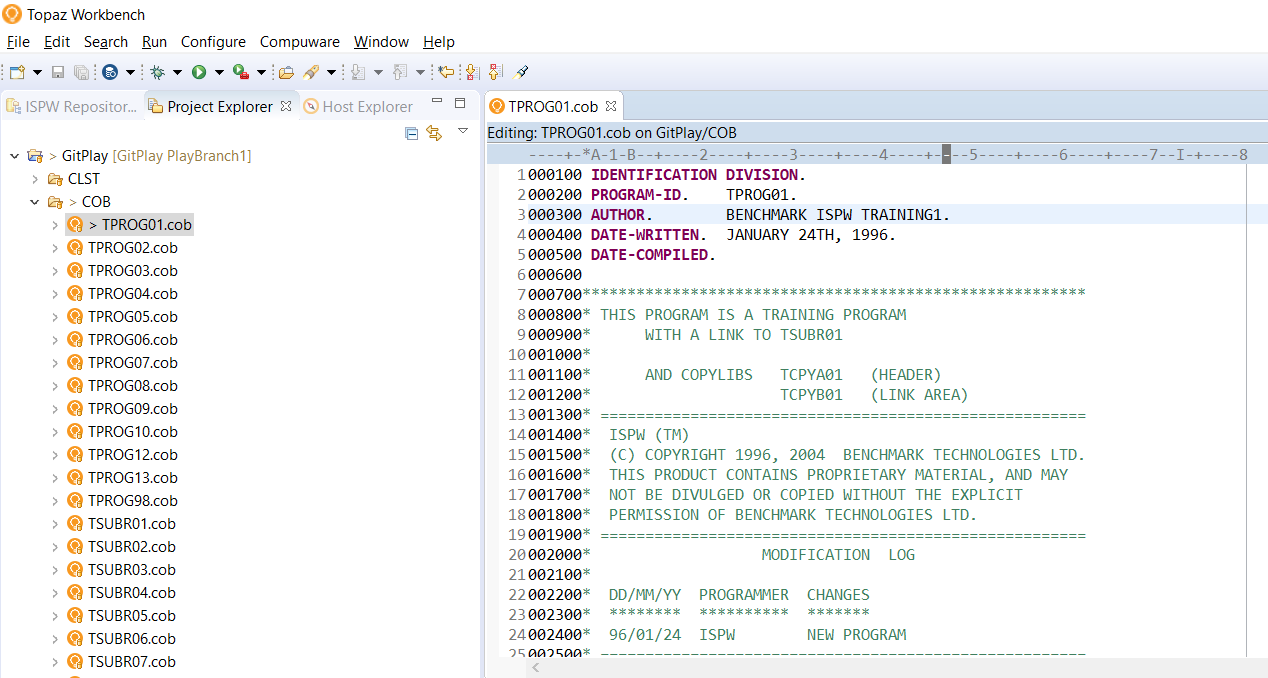
In Topaz Workbench’s Project Explorer view, expand GitPlay>COB.
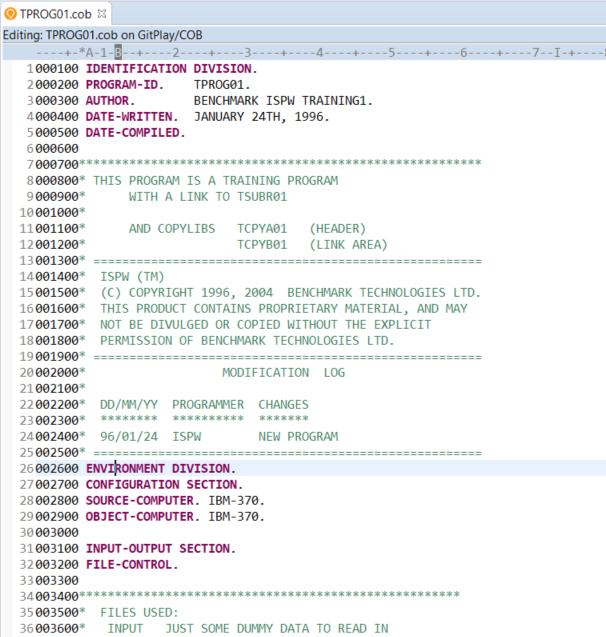
Right-click TPROG01.cob and select Open. The source opens in the editor.
On line 3, change the Author from BENCHMARK ISPW TRAINING to BENCHMARK ISPW TRAINING1.
From the File menu, select Save.
Perform the Build Action to Verify the Source Generates Successfully Along With Any Impacted Components
In Topaz Workbench’s Project Explorer view, right-click the GitPlay project node and select Properties>ISPW. The ISPW page of the Properties dialog box appears.
In the YAML mapping file location field, enter or browse to the YAML mapping file.
In the Level field, enter DEV1 as the life cycle level for the project that will be used to load the file into ISPW at that level. The level value is required to perform any ISPW action.
Optionally, in the Assignment description field, enter the assignment name to be used for the generate/build process; click Insert Variable, if desired, to choose variables to build the assignment name. Note that, if no valid value exists for the chosen variable, the Description field in the Containers view will treat the variable as empty, Descriptions longer than 50 characters will be truncated. The default assignment description is ${user} ${branch_name}.
Click Apply and Close.
In the Project Explorer view’s COB folder, right-click TPROG01.cob and select ISPW>Build. The Console view shows the progress of the build.
**NOTE:** If an ISPW pop-up appears, click **YES** to continue. :::
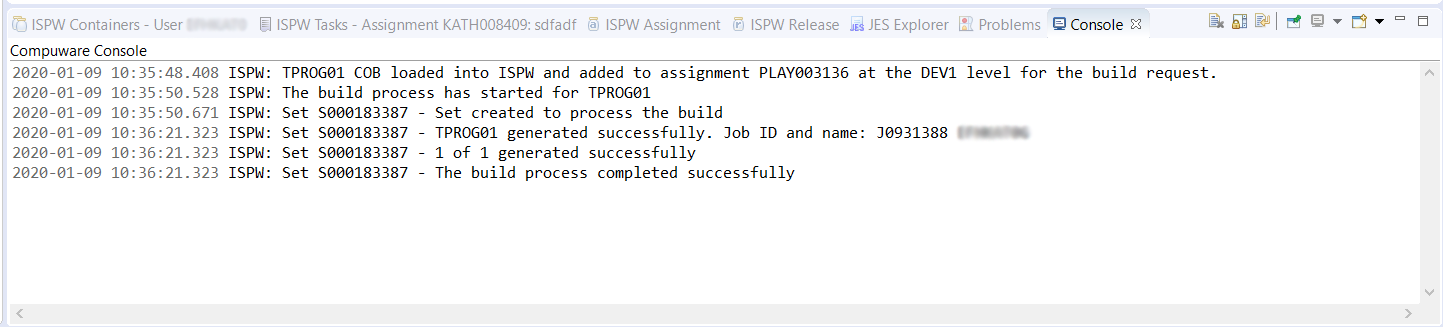
In the Console view, note the assignment where TPROG01 was loaded. In the example above, TPROG01 was loaded into assignment PLAY003136 at the DEV1 level.
Update the Jenkinsfile Build ISPW assignment stage
In Topaz Workbench’s Project Explorer view’s GitPlay project, right-click Jenkinsfile and select Open. The source’ opens in the editor.
In the Build ISPW assignment stage, verify that the ispwRequestBody reads “‘buildautomatically=true’”.
From the File menu, select Save.
From the File menu, select Close.
TIP
In order to properly sync changed files between Git and ISPW, please do not change the ISPW level of Jenkinsfile’s branch mapping during pipeline execution.
Submit change to pipeline
Commit and Push the Changes to Git
First commit and push only the Jenkinsfile so the updated assignmentId is used for the change to TPROG01. Then commit and push TPROG01.
Commit and Push the Jenkinsfile
In Topaz Workbench, open the Git perspective’s Git Staging view.
If the Git Staging view is not set to the GitPlay repository, click
and select GitPlay to switch to the GitPlay repository.In the Unstaged Changes box, select the Jenkinsfile file and click
 to add it to the Staged Changes box.
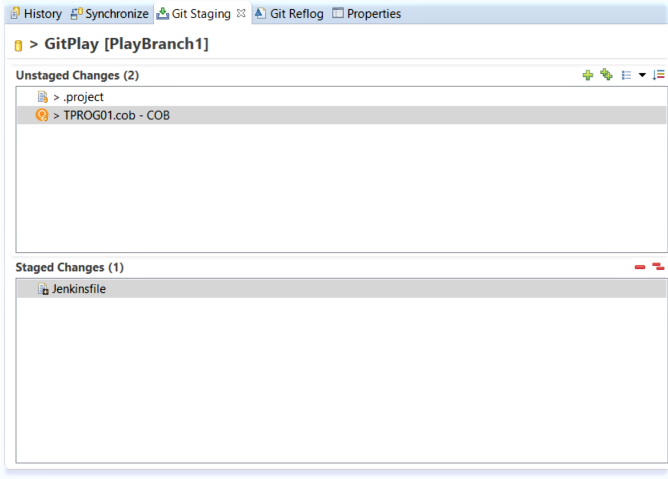
In the Commit Message box, enter a commit message, such as Jenkinsfile commit.
Click Commit and Push. The Push Results dialog box appears.
Click Close.
Commit and Push TPROG01
In the Unstaged Changes box, select TPROG01 and click
to add it to the Staged Changes box.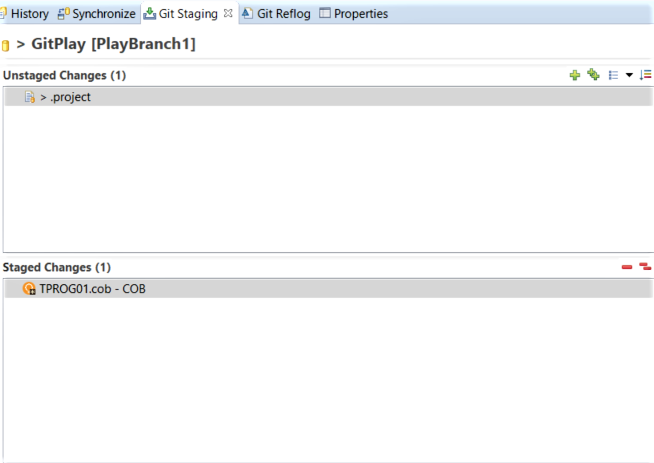
In the Commit Message box, enter a commit message, such as TPROG01 commit.
The Push Results dialog box appears.
Determine Whether the Synchronization Process Completed Successfully
Two jobs will be triggered for the Jenkins multibranch pipeline project within a one-minute interval: one job when the Jenkinsfile was pushed and one job when TPROG01 was pushed.
- In Jenkins, examine the second job. In the multibranch pipeline project, in the Branches section, select PlayBranch1. Within the Pipeline PlayBranch1, go to the Build History section where the jobs are listed.
- Once the job completes, go to the Console Output. The Console Output link is in the multibranch pipeline project’s sidebar.
The following is an example of what the Console Output will show for a successful Git to ISPW synchronization (the second stage of the Jenkinsfile):
Finished synchronizing changes from Git to ISPW assignment PLAY003145 at level DEV1
COB/TPROG01.cob     ----- Success
1 total changes detected during synchronization: Success 1, Failure 0, Skipped 0
The following is an example of what the Console Output will show for a successful build (the third stage of the Jenkinsfile):
1 task will be built as part of S000183395
TPROG01 has been compiled successfully
1 of 1 generated successfully. 0 of 1 generated with errors.
The build process was successfully completed.
TIP
Git commit information can be viewed in Topaz within the ISPW Assignment view and the ISPW Release view.
CAUTION
For Topaz release 20.07.01, the ISPW CLI will skip loading deleted files during the Git to ISPW synchronization.
Verify the Updates Occurred to the Mainframe**
In Topaz Workbench’s ISPW Containers view, find the assignment where TPROG01 was loaded and double-click the assignment. The ISPW Tasks view appears.
Double-click TPROG01. The source is opened in the editor.
Note: If a copybook download message appears, click No to not download copybooks.
Verify that line 3 shows BENCHMARK ISPW TRAINING1 for Author.
Configuring a copybook concatenation list for a Git project
By configuring a copybook concatenation list, it will allow your programs to download the correct copybooks defined by the project list in the order they are provided. Keep in mind, the copybooks are only downloaded upon opening a component from the project explorer view, or if the Download Copybooks context menu option is selecting when right clicking from the editor itself.
TIP
Before configuring a copybook concatenation list, it is a good idea to have your other Git projects already created/imported into your workspace. These other Git projects will be candidate for selection during the copybook concatenation configuration.
In Topaz Workbench's Project Explorer, find the Git project where copybook concatenation list will be configured.
Right click on the project then click on Properties.
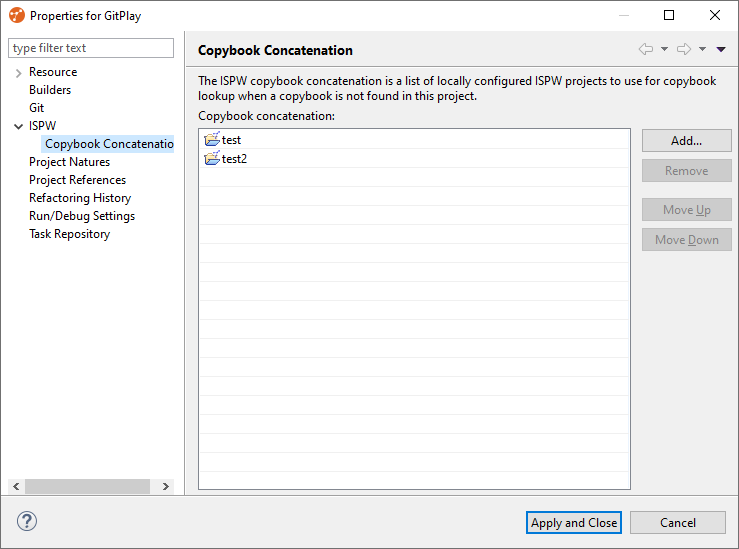
Within the properties, click on the arrow next to the ISPW node, followed by clicking on Copybook Concatenation.
On the right hand side, click on the Add... button. Another window titled Copybook Concatenation will display with all the other projects that have been configured to utilize the ISPW Nature. The nature of the project can change in the same properties window within the Project Natures node.
Within the Copybook Concatenation window, you can select all or partial projects from the list. Click OK when you are finished selecting your projects.
Back in the properties window, you should now see the Git projects you selected in the previous step. See image below for a preview.
You can also arrange the ordering of the projects by selecting one and clicking on the Move Up or Move Down buttons on the right-hand side.
TIP
The ordering of the Git projects is important. During the copybook download process, the copybook is downloaded according to the ordering of the configured list of projects. For example, if you have configured your concatenation list to include projects test1 & test2, the copybook download process will first look for the referenced copybook in test1 and if not found, it will finally check within test2.